


一、准备环境
系统要求:ubuntu 18.04+
二、安装ansible
要获取最新版本的Ansible for Ubuntu,您可以将项目的PPA(个人包存档)添加到您的系统。 但是,在执行此操作之前,您应首先更新软件包索引并安装software-properties-common软件包。 该软件可以更轻松地管理这个和其他独立的软件存储库:
sudo apt update
sudo apt install software-properties-common
键入以下命令添加Ansible PPA:
sudo apt-add-repository ppa:ansible/ansible
按ENTER接受PPA添加。 接下来,再次刷新系统的包索引,以便它知道PPA中可用的包:
sudo apt update
在此更新后,您可以安装Ansible软件:
sudo apt install ansible
三、配置ansible
从步骤二安装的ansible,配置文件应该在/etc/ansible上了,因此不需要进行模板拷贝了

这个需要取消注释,后面第一次访问客户机的时候不会弹出需要验证的窗口,干扰正常使用。
四、最为简单的安装。–只针对centos系统
centos7以下的系统需要先配置epel源:
yum install epel-release
Centos7版本以上的系统直接运行:
Centos7版本以上的系统直接运行:
五。ansible 免密登录的部署
先附上自动化脚本:
ssh-keygen -f /root/.ssh/id_rsa -p ' '
NET=192.168.1
export SSHPASS=wikiblog
for IP in {2,254};do
     sshpass -e ssh-copy-id $NET.$IP
done
注意: 在ubuntu18.04系统以上,为了避免使用普通用户造成权限,以及纠错花费过多的时间,建议直接使用root用户来做免密登录的用户。
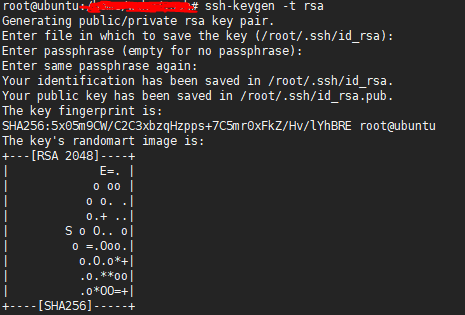
ssh-keygen -t rsa
需要先将修改hosts文件如图:vim /etc/ansible/hosts

需要先将修改hosts文件如图:vim /etc/ansible/hosts
用密钥登录的格式:

然后试一下:ansible all -a ‘pwd’
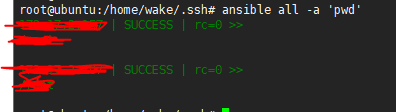
如图成功即可 然后需要把公钥添加个各个主机:
ssh-copy-id -i ~/.ssh/id_rsa.pub root@xxx.xxx.xxx.xxx
最后需要执行:
ssh root@xxx.xxx.xxx.xxx
成功之后需要删掉密码
遇到的错误:
1.{"changed": false, "msg": "Authentication or permission failure. In some cases, you may have been able to authenticate and did not have permissions on the target directory. Consider changing the remote tmp path in ansible.cfg to a path rooted in \"/tmp\"}
解决方法:
vim /etc/ansible/ansible.cfg
remote_tmp = /tmp
{Using a SSH password instead of a key is not possible because Host Key checking is enabled and sshpass does not support this. Please add this host's fingerprint to your known_hosts file to manage this host. }
解决方法:
在ansible.cfg配置文件中,也会找到如下部分:
uncomment this to disable SSH key host checking
host_key_checking = False 默认host_key_checking部分是注释的,通过找开该行的注释,同样也可以实现跳过 ssh 首次连接提示验证部分。
评论区