


前言:
AWS EKS 集群自动扩容 Cluster Autoscaler 功能可以自动调整集群中 node 的数量以适应需求变化。
Cluster Autoscaler 一般以 Deployment 的方式部署在 K8s 中。AWS EKS Cluster Autoscaler 以 Amazon EC2 Auto Scaling groups 服务为基础对 node 进行扩容。
实战步骤
1. 查看 EC2 Auto Scaling groups Tag
Cluster Autoscaler 使用 EC2 Auto Scaling groups 服务对 node 进行扩容,我们需要确保 EKS 对应的 Auto Scaling groups 有适合的 Tag。
Cluster Autoscaler 通过 Tag 来识别哪些 Auto Scaling groups 属于其管辖范围。
如果我们使用 eksctl 命令或者 AWS 网页控制台来创建 node group,则所需 Tag 已经自动设置了,如果用其它方式创建的 node group 则需要确保其对应用的 Auto Scaling groups 中有以下两个 Tag

说明:“cluster-name”为 EKS 的名称
下面,在 EC2 界面查看一下之前创建的 EKS node group 对应的 Auto Scaling groups 信息。
在 AWS 中控台选择“EC2”,进入 EC2 界面,在左边列表中选择“Auto Scaling Groups”,在右边选中Auto Scaling groups

说明:Auto Scaling groups 的名称在创建 node group 时自动创建,其中会包含 node group 的名称
选择“Details”后,拉到最下面,可以看到需要的两个 Tag 已经打好
2. 创建 sa 需要的 Policy,Role
与 EKS 访问 S3 和 EFS 类似,通过 service account(sa)来给 Cluster Autoscaler 的 Pod 提供访问 AWS 的 EC2 Auto Scaling groups 的权限。
所以先创建 sa 需要的 Policy 和 Role
2-1.
新建文件 cluster-autoscaler-policy.json,并粘贴以下内容
{
    "Version": "2012-10-17",
    "Statement": [
        {
            "Action": [
                "autoscaling:DescribeAutoScalingGroups",
                "autoscaling:DescribeAutoScalingInstances",
                "autoscaling:DescribeLaunchConfigurations",
                "autoscaling:DescribeTags",
                "autoscaling:SetDesiredCapacity",
                "autoscaling:TerminateInstanceInAutoScalingGroup",
                "ec2:DescribeLaunchTemplateVersions"
            ],
            "Resource": "*",
            "Effect": "Allow"
        }
    ]
}
说明:这个 policy 提供访问 EC2 autoscaling group 的相关权限
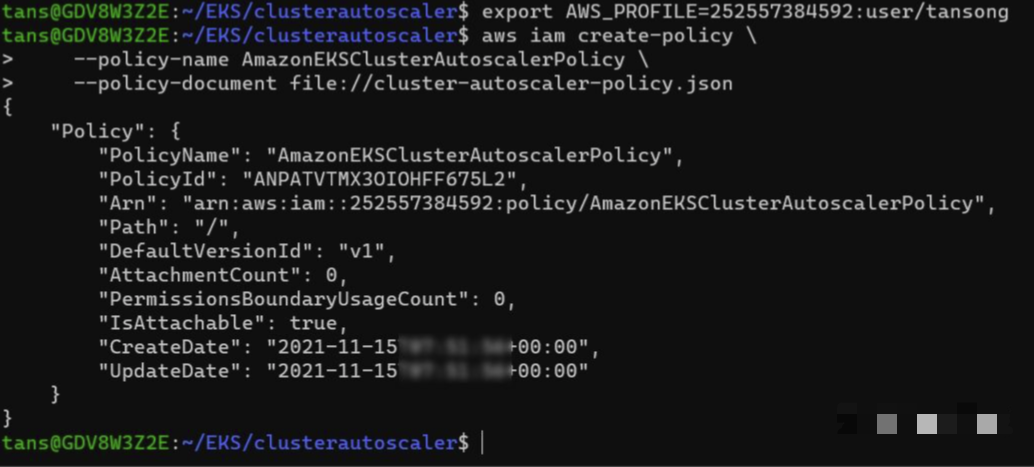
运行以下命令,创建 Policy
aws iam create-policy \
    --policy-name AmazonEKSClusterAutoscalerPolicy \
    --policy-document file://cluster-autoscaler-policy.json
运行结果
2-2.创建 IAM Role
以下创建 Role 的步骤与《AWS-EKS集群部署存储卷 EFS》一文中创建 Role 的步骤相同,只是 policy,role 名称以及 service account 名称不同。
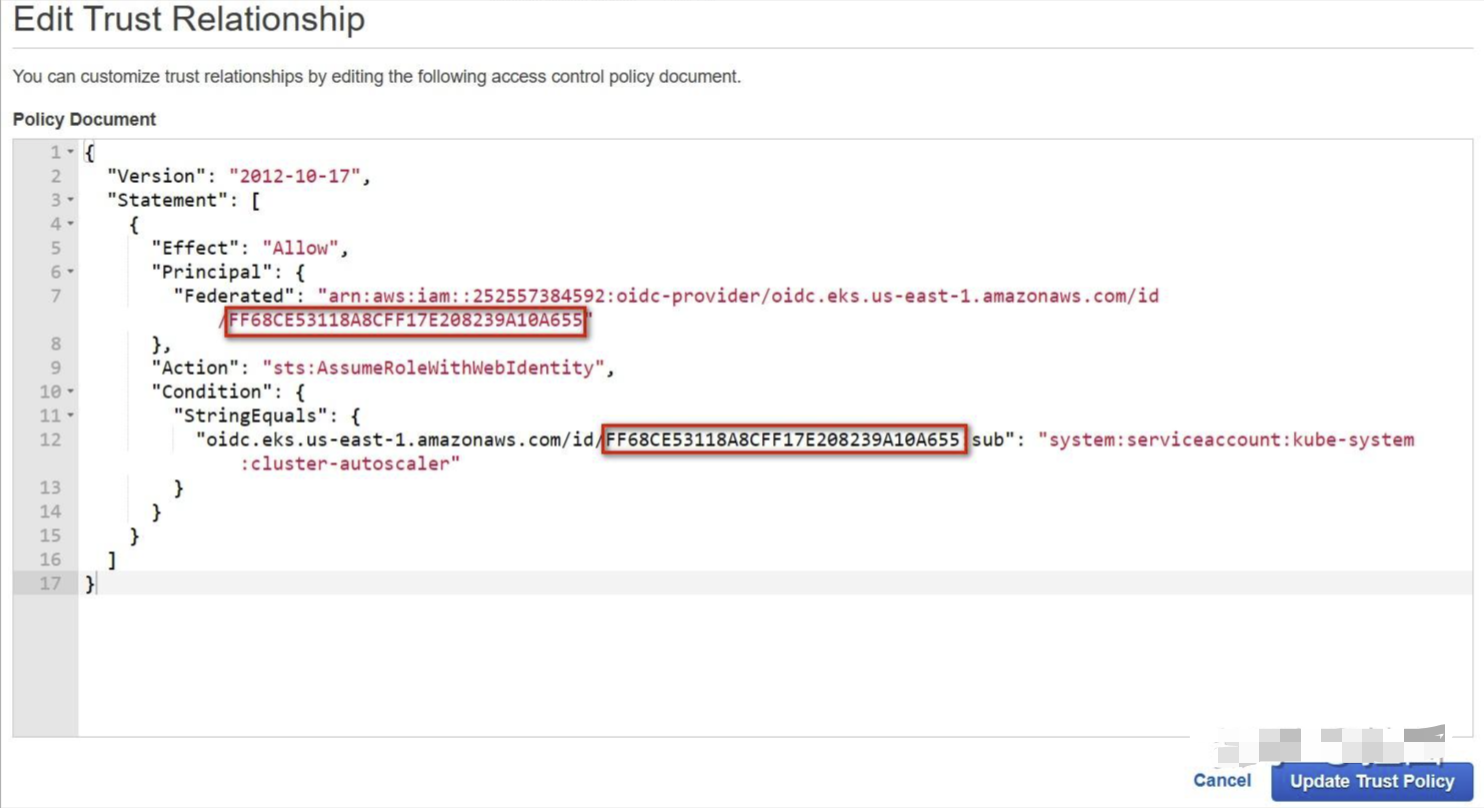
IAM Role 中包括 IAM policy 和 trust relationship 两部分,先用 json 文件来定义 trust relationship 的内容。
创建“trust-policy.json”文件,并粘贴并修改以下内容
{
"Version": "2012-10-17",
"Statement": [
{
"Effect": "Allow",
"Principal": {
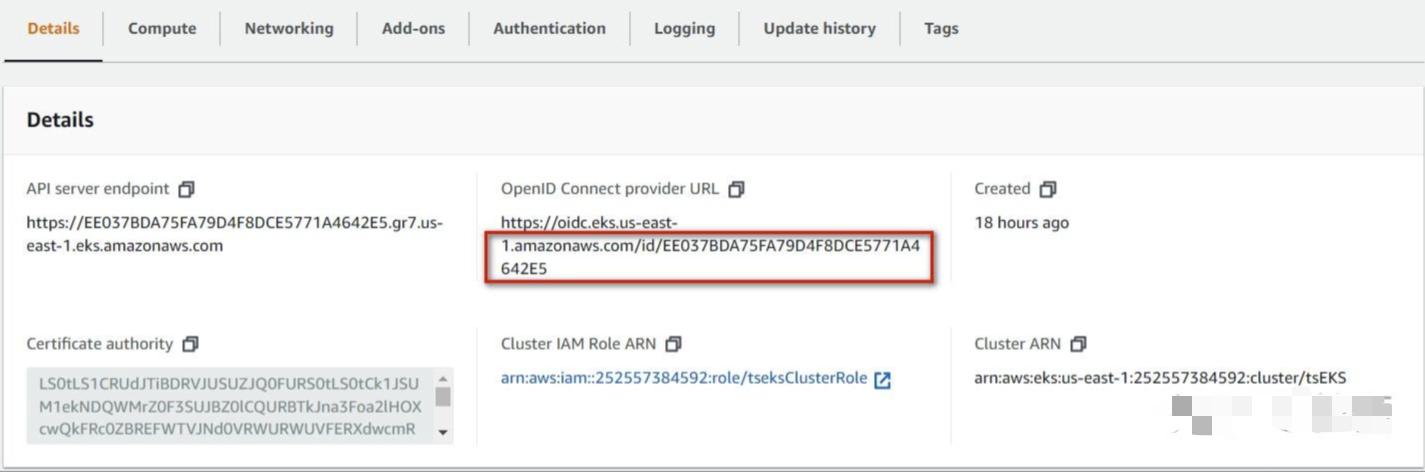
"Federated": "arn:aws:iam::252557384592:oidc-provider/oidc.eks.us-east-1.amazonaws.com/id/EE037BDA75FA79D4F8DCE5771A4642E5"
},
"Action": "sts:AssumeRoleWithWebIdentity",
"Condition": {
"StringEquals": {
"oidc.eks.us-east-1.amazonaws.com/id/EE037BDA75FA79D4F8DCE5771A4642E5:sub": "system:serviceaccount:kube-system:cluster-autoscaler"
}
}
}
]
}
说明:
- trust-policy.json 在创建 Role 时,指定“Trust relationships”中的内容
- 修改“252557384592”为自己的 AWS Account
- 修改“us-east-1”为自己的 Region
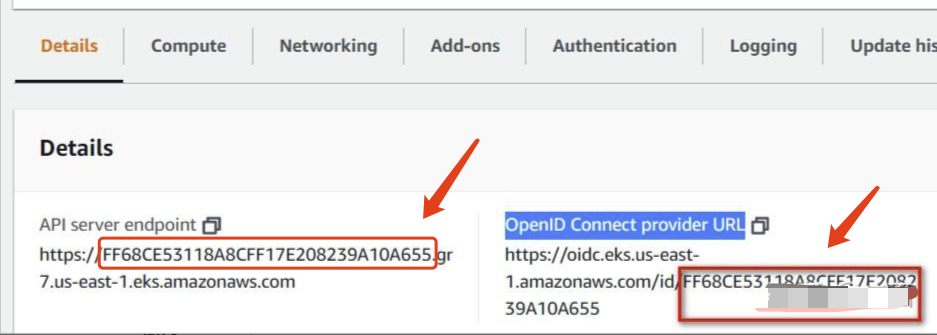
- 修改“EE037BDA75FA79D4F8DCE5771A4642E5”为自己 EKS 的 OpenID Connect provider URL 中最后的字符串,如下所示
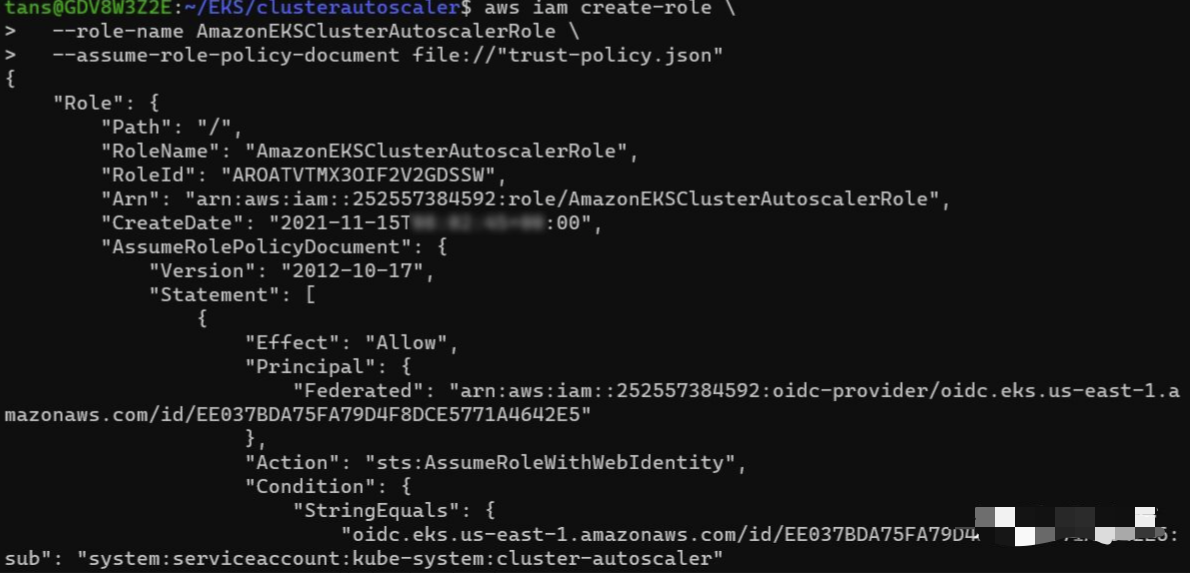
然后,运行下列命令创建 IAM Role
aws iam create-role \
  --role-name AmazonEKSClusterAutoscalerRole \
  --assume-role-policy-document file://"trust-policy.json"
说明:
- role-name:自定义 Role 的名称
- assume-role-policy-document:指定本地 trust-policy 文件
运行结果
最后,运行下列命令为 Role 添加我们在第一步中创建的 Policy
aws iam attach-role-policy \
  --policy-arn arn:aws:iam::252557384592:policy/AmazonEKSClusterAutoscalerPolicy \
  --role-name AmazonEKSClusterAutoscalerRole
说明:
- policy-arn:指定要绑定的 Policy 的 ARN
- role-name:指定 Role 名称

3.部署 Cluster Autoscaler
运行以下命令下载 Cluster Autoscaler 的 yaml 文件
#下载yaml文件
wget https://raw.githubusercontent.com/kubernetes/autoscaler/master/cluster-autoscaler/cloudprovider/aws/examples/cluster-autoscaler-autodiscover.yaml

修改 yaml 文件配置
打开以下 Cluster Autoscaler 的 github 的网面,查看与 EKS 版本匹配的最新 Autoscaler 镜像版本 https://github.com/kubernetes/autoscaler/releases
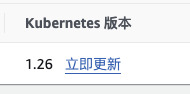
我们 EKS 的版本是 1.26.12,查找到对应的最新镜像为 1.26.6
EKS 版本在控制面板或者用kubectl查看
Github 里查看对应的最新镜像版本

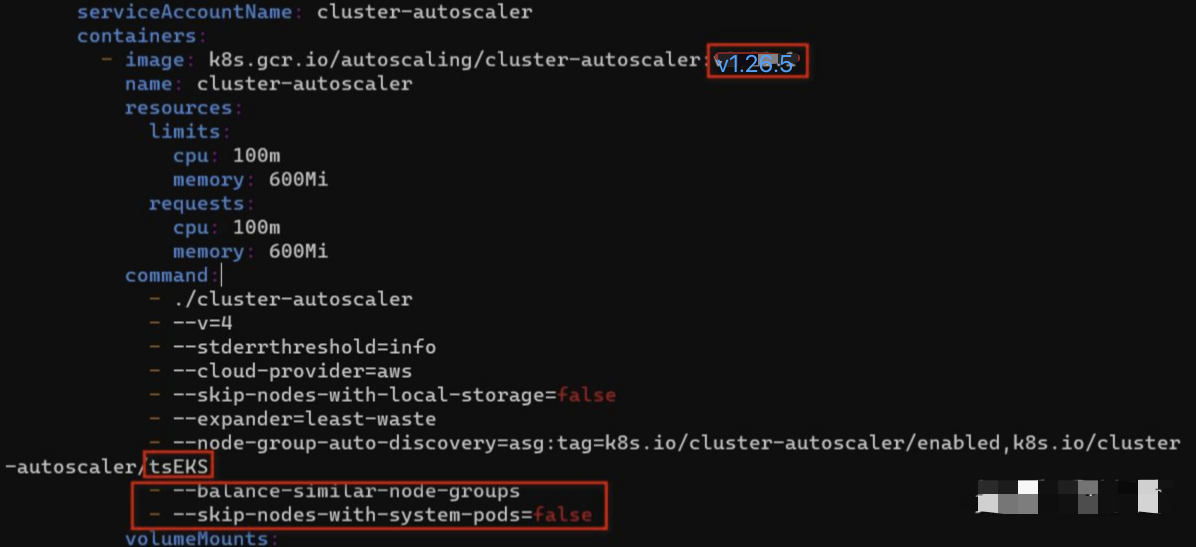
用文本编辑打开 cluster-autoscaler-autodiscover.yaml 文件,进行以下操作
3-1.查找并替换“YOUR CLUSTER NAME”为 EKS 的名称

3-2.在 EKS 的名称“tsEKS”下面,并添加以下两行
- --balance-similar-node-groups
- --skip-nodes-with-system-pods=false
3-3.把 cluster-autoscaler 的镜像版本换成上面查到的版本 1.26.5
更改之后结果如下,保存退出
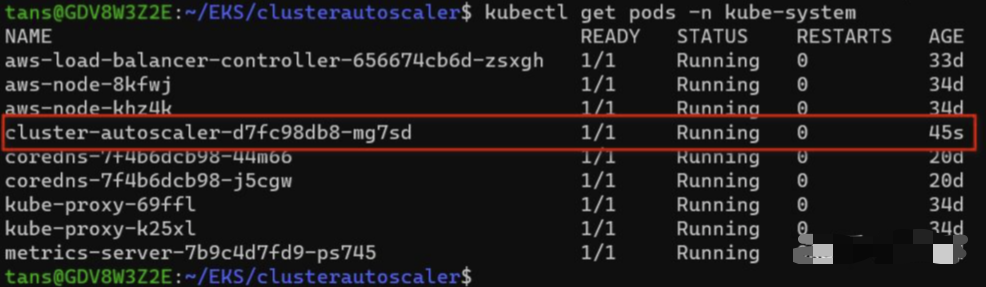
运行以下命令部署 Cluster Autoscaler
kubectl apply -f cluster-autoscaler-autodiscover.yaml

查看 Cluster Autoscaler pod
kubectl get pods -n kube-system
绑定 Role
运行以下命令,为 service account “cluster-autoscaler”绑定 IAM Role
kubectl annotate serviceaccount cluster-autoscaler \
  -n kube-system \
  eks.amazonaws.com/role-arn=arn:aws:iam::252557384592:role/AmazonEKSClusterAutoscalerRole

说明:我们也可以在 cluster-autoscaler-autodiscover.yaml 文件中直接修改 service account “cluster-autoscaler”增加 annotations
Patch deployment
运行以下命令给 autoscaler deployment 打 patch,增加 annotation
kubectl patch deployment cluster-autoscaler \
  -n kube-system \
  -p '{"spec":{"template":{"metadata":{"annotations":{"cluster-autoscaler.kubernetes.io/safe-to-evict": "false"}}}}}'

说明:同样的,也可以在 cluster-autoscaler-autodiscover.yaml 文件中直接修改 deployment 增加 annotations
如果有 autoscaler 有新的镜像,我们可以通过以下命令设置直接在 deployment 中更改镜像版本
kubectl set image deployment cluster-autoscaler \
  -n kube-system \
  cluster-autoscaler=k8s.gcr.io/autoscaling/cluster-autoscaler:v<1.27.n>
4. 常见错误
如果部署后发现,Pod 反复重启,最后处于“CrashLoopBackOff”状态

查看 Pod 日志,运行以下命令把 pod 日志重定向到本地文件 autoscaler.log
kubectl logs pods/cluster-autoscaler-77cb5c59b7-mcfmj -n kube-system >autoscaler.log
如果在日志中查到以下错误,则说明我们创建 Role 的 Trusted entities 配置的有问题
E1115 09:19:08.674914       1 aws_manager.go:265] Failed to regenerate ASG cache: cannot autodiscover ASGs: WebIdentityErr: failed to retrieve credentials
caused by: AccessDenied: Not authorized to perform sts:AssumeRoleWithWebIdentity
        status code: 403, request id: 8b300376-94bf-463d-9fc8-775a95d1c559
在 AWS IAM 中控台选择上面创建的 role “ AmazonEKSClusterAutoscalerRole”,点击“Edit trust relationship”
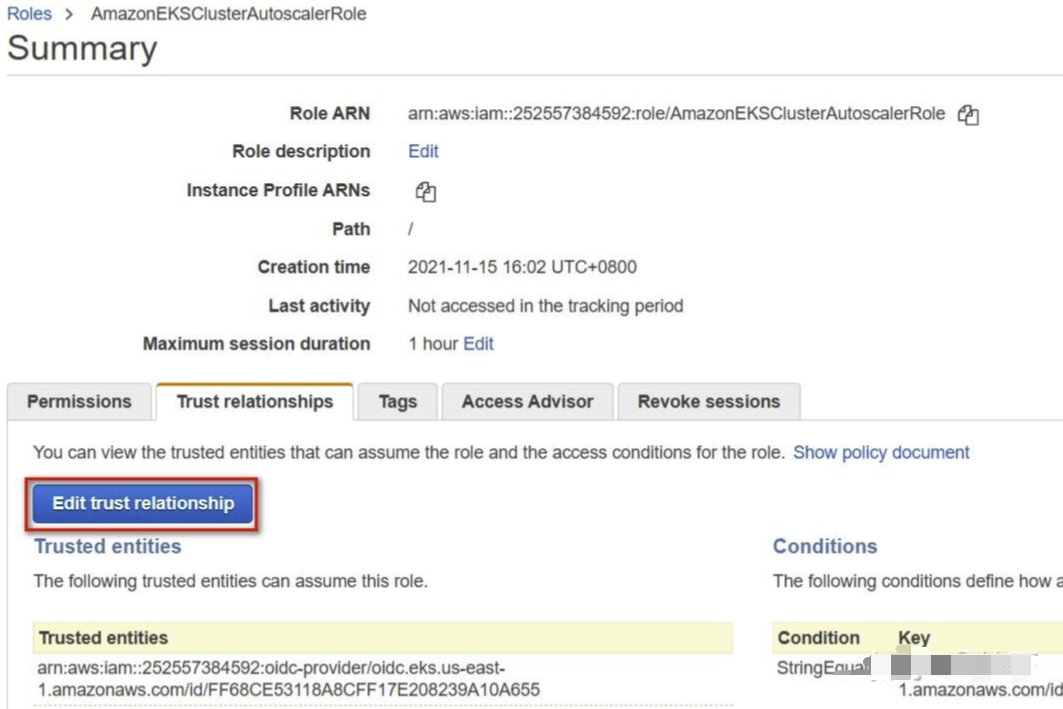
记下以下两个 ID
确保这两个 ID 与 EKS 控制台上的 URL 中的 ID 一致,修改一致后,autoscaler 的 Pod 就会自动重建成功
5.测试 Autoscaler
5-1.创建测试 deployment
新建文件 testpod.yaml,并粘贴以下内容
apiVersion: apps/v1
kind: Deployment
metadata:
  name: nginx-deployment
  labels:
    app: nginx
spec:
  replicas: 1
  selector:
    matchLabels:
      app: nginx
  template:
    metadata:
      labels:
        app: nginx
    spec:
      containers:
      - name: nginx
        image: nginx:1.14.2
        ports:
        - containerPort: 80
说明:testpod.yaml 创建一个简单的 deployment,其中运行一个 nignx Pod
运行以下命令创建 deployment
kubectl apply -f testpod.yaml
kubectl get deployments
可以看到这个 deployment 中有一个 pod 在运行

5-2.增加pod数量,提高node节点的工作负担,触发节点扩容
把 deployment 中运行 pod 的数量改成 5 个,运行以下命令修改 deployment
kubectl edit deployment/nginx-deployment
kubectl edit 会打开默认的文本编辑器,把 replicas 改成 5
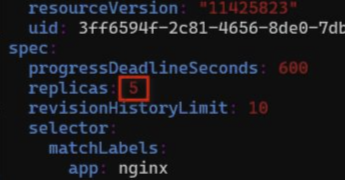
然后保存退出

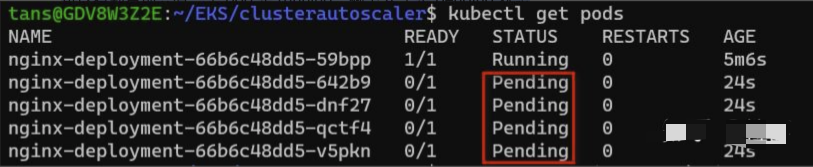
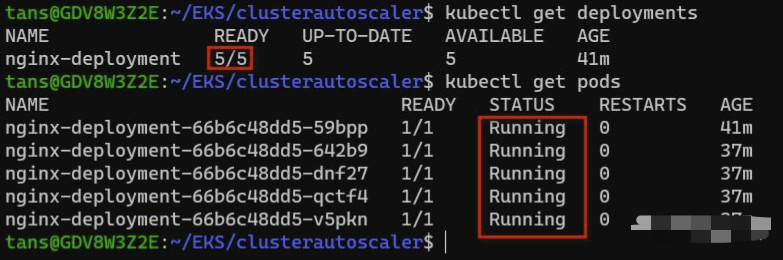
这时再查看 deployment 和 pod 的信息
kubectl get deployments
kubectl get pods
可以看到目前只有一个 pod 是 running,剩下 4 个是 pending 状态

注意:如果在你的环境中 5 个 pod 马上就运行成功了,说明资源足够,那可以把 replicas 改成 10 或者更大,以触发扩容。
用 describe 命令查看其中一个 Pod
kubectl describe pods/nginx-deployment-66b6c48dd5-642b9
可以看到自动扩展已经触发,但达到最大 group size 所以失败了
Events:
  Type     Reason             Age                  From                Message
  ----     ------             ----                 ----                -------
  Normal   NotTriggerScaleUp  49s (x121 over 20m)  cluster-autoscaler  pod didn't trigger scale-up: 1 max node group size reached
  Warning  FailedScheduling   26s (x21 over 21m)   default-scheduler   0/2 nodes are available: 2 Too many pods.
原因在于,之前创建的 node group,最大 node 数量是 2,目前的 node 数量已经达到最大
node group 信息如下
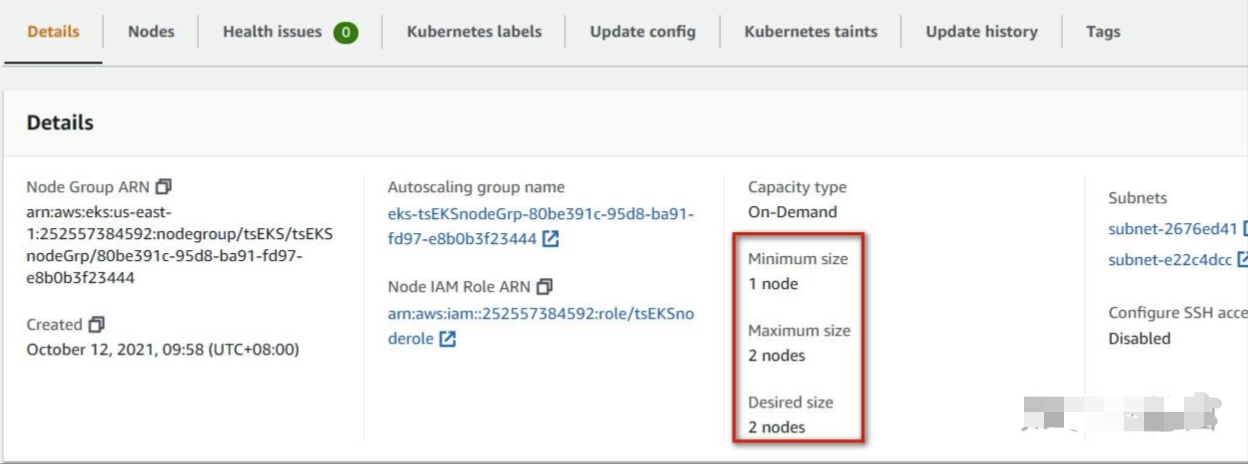
autoscaling groups 里的信息

下面,我们调整 node group 的 max size
在 EKS 界面,选择我们的“tsEKS”,选择“Configuration”,选择“Compute”,勾选 node group 名称“tsEKSnodeGrp”,点击“Edit”

把“Maximum size”改成 3,然后拖到最下面,点击“Save changes”

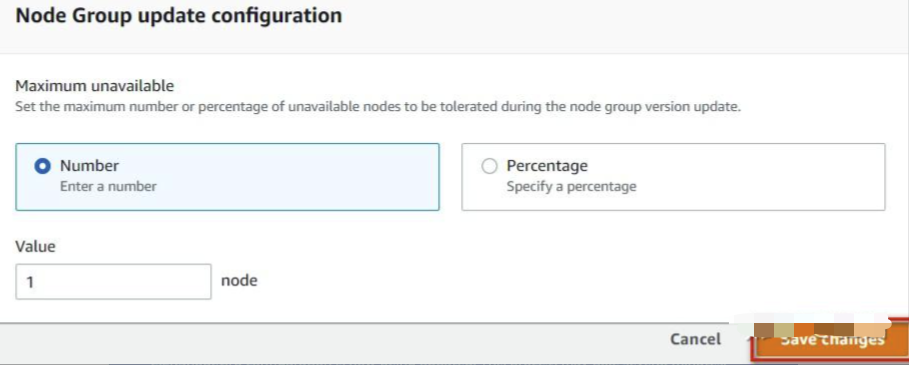
更改完成
过一会儿,我们刷新界面,可以看到新的 node
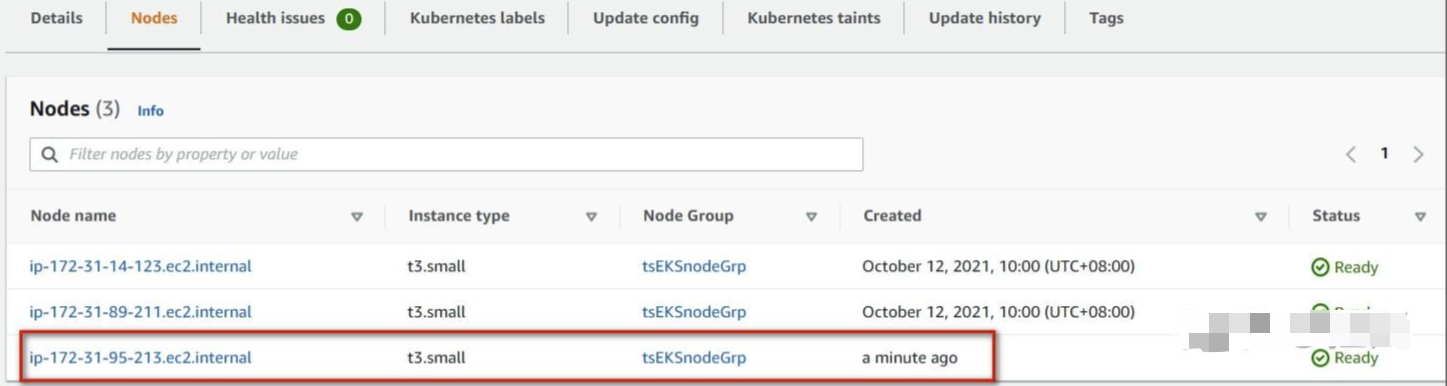
这时再观察 deployment 和 pod,可以看到所有 pod 都正常运行了,说明扩容成功了
5-3.测试EKS集群的缩容。
用上面同样的方法,把 deployment 中 pod 数量改回 1 个

过大概 10 几分钟,可以看到新增的 node 已经停止

总结
1.
这个测试其实只能在这个t3.small 2核2G的低配置的节点上进行测试。一般的EKS集群工作节点的配置都是比较好的,可能需要增加几十个pod才能看出扩容的效果。
2.
cluster autoscaler 以 deployment 的形式运行在 EKS 中,通过 service account 赋予的权限来访问 AWS autoscaling group 资源,并控制 node(EC2)的增减。
默认情况下,当有新的 Pod 无法在现有 node 上 schedule 时会触发 scale up,当 node 空闲超过 10min 时,会触发 scale down。
cluster autoscaler 可以在 deployment 中指定参数来控制 node 增减的最大数量(这里并未设置 --nodes=min:max:asg-name),但此数量会受 nodegroup 本身设定 node 最大小数量的限制。
我们还可以观察 autoscaler 的日志来查看 sacle 的过程,这个日志比较多所以上面并没有展示
kubectl logs pods/cluster-autoscaler-77cb5c59b7-mcfmj -n kube-system
评论区