


前言:网上能搜索的不少,不过好像都不管用 基本命令了解:
oot@ubuntu:~# ulimit -a
core file size          (blocks, -c) 0
data seg size           (kbytes, -d) unlimited
scheduling priority             (-e) 0
file size               (blocks, -f) unlimited
pending signals                 (-i) 31498
max locked memory       (kbytes, -l) 64
max memory size         (kbytes, -m) unlimited
open files                      (-n) 1024
pipe size            (512 bytes, -p) 8
POSIX message queues     (bytes, -q) 819200
real-time priority              (-r) 0
stack size              (kbytes, -s) 8192
cpu time               (seconds, -t) unlimited
max user processes              (-u) 31498
virtual memory          (kbytes, -v) unlimited
file locks                      (-x) unlimited
红字部分就是打开文件数1024个,一般这个太小了。也可以用ulimit -n查看
如何进行设置:
sudo vim /etc/security/limits.conf
文件尾追加
* hard nofile 65535
* soft nofile 65535
4096可以自己设置,四列参数的设置见英文,简单讲一下:
第一列,可以是用户,也可以是组,要用@group这样的语法,也可以是通配符如*%
第二列,两个值:hard,硬限制,soft,软件限制,一般来说soft要比hard小,hard是底线,决对不能超过,超过soft报警,直到hard数
第三列,见列表,打开文件数是nofile
第四列,数量,这个也不能设置太大
#
#Each line describes a limit for a user in the form:
#
#<domain>        <type>  <item>  <value>
#
#Where:
#<domain> can be:
#        - an user name
#        - a group name, with @group syntax
#        - the wildcard *, for default entry
#        - the wildcard %, can be also used with %group syntax,
#                 for maxlogin limit
#        - NOTE: group and wildcard limits are not applied to root.
#          To apply a limit to the root user, <domain> must be
#          the literal username root.
#
#<type> can have the two values:
#        - "soft" for enforcing the soft limits
#        - "hard" for enforcing hard limits
#
#<item> can be one of the following:
#        - core - limits the core file size (KB)
#        - data - max data size (KB)
#        - fsize - maximum filesize (KB)
#        - memlock - max locked-in-memory address space (KB)
#        - nofile - max number of open files
#        - rss - max resident set size (KB)
#        - stack - max stack size (KB)
#        - cpu - max CPU time (MIN)
#        - nproc - max number of processes
#        - as - address space limit (KB)
#        - maxlogins - max number of logins for this user
#        - maxsyslogins - max number of logins on the system
#        - priority - the priority to run user process with
#        - locks - max number of file locks the user can hold
#        - sigpending - max number of pending signals
#        - msgqueue - max memory used by POSIX message queues (bytes)
#        - nice - max nice priority allowed to raise to values: [-20, 19]
#        - rtprio - max realtime priority
#        - chroot - change root to directory (Debian-specific)
#
#<domain>      <type>  <item>         <value>
#


#*               soft    core            0
#root            hard    core            100000
第二步:/etc/pam.d/su(官方)或/etc/pam.d/common-session(网络)
sudo vim /etc/pam.d/su
将 pam_limits.so 这一行注释去掉
重启系统

sudo vim /etc/pam.d/common-session
加上以下一行
session required pam_limits.so
打开/etc/pam.d/su,发现是包含/etc/pam.d/common-session这个文件的,所以修改哪个文件都应该是可以的
这个觉得修改su这个文件比较好,取消注释就OK了,不容易出错,vim打开,定位,x一下即可
官方只到第二步,就重启系统了,没有第三步,好象不行,感觉是不是全是第三步的作用?!
第三步:配置/etc/profile和/etc/bash.bashrc
最后一行加上
ulimit -SHn 65535
重启,ulimit -n 验证,显示65535就没问题了
解释:
对于普通用户(如 ubuntu)运行的程序,新的 ulimit 值会生效。但对于 root 运行的程序,以sudo运行的程序,仍然会使用 1024,因为 root 没有继承 /etc/profile 的设置。
如果你的应用是 ubuntu 用户启动的,它会继承 ulimit -n 65535。
但如果你的应用是 以 root 身份运行的,它可能仍然受 ulimit -n 1024 限制,所以两个文件都需要加上。
注意:并不是所有应用就可以解除原先的1024文件数的限制。
情况一:一台服务器systemd下的nginx服务出现了,系统修改了最大连接数,它还是只有1024连接数的情况
以nginx应用作为例子
一、首先查看nginx的主进程号
#ps -ef | grep nginx

二、然后查看进程号的最大文件打开数
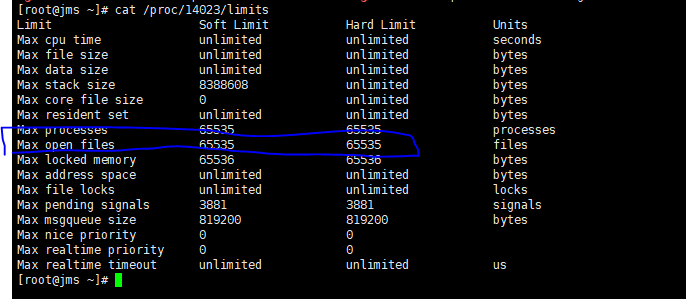
如图已设置成65535最大连接数。
假如没有进行更改,就需要找到nginx.service进去增加
LimitNOFILE=65535
LimitNPROC=65535
两行参数,然后重启服务进行更改
三、修改过程如下:
1.先找到程序文件:
2.进去增加参数:
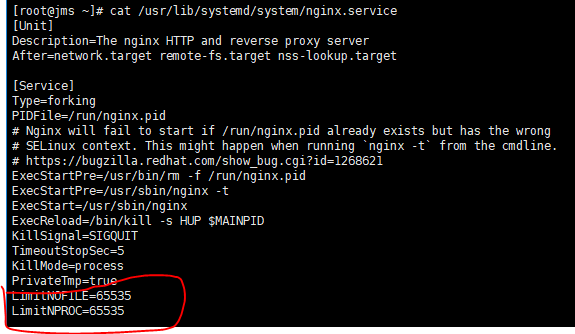
LimitNOFILE=65535
LimitNPROC=65535
3.最后重启服务即可
#service nginx restart
评论区