


前言:
k8s的部署方式多种多样,但无论采用什么方式,首先都要准备好所需的计算机环境。本文就详细说明基于Kubeadm如何部署K8S集群。
1.准备计算机
您需要准备三台计算机。虚拟机,物理机,云服务器均可,各项配置尽可能高一些。这三台计算机应部署有Linux系统,且能互相通信。不同环境的推荐配置如下:
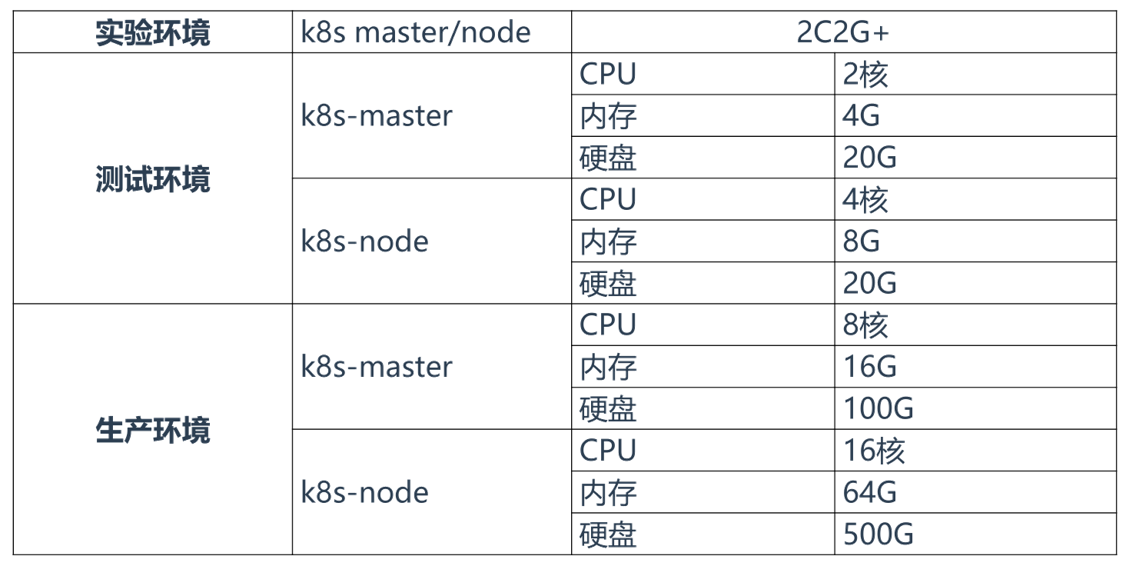
本教程中使用的计算机是本地虚拟化的三台虚拟机,操作系统为64位CentOS7

2.升级Linux内核到最新版
这里建议直接使用CentOS7.9的操作系统,避免部署高版本的K8S集群出现问题。
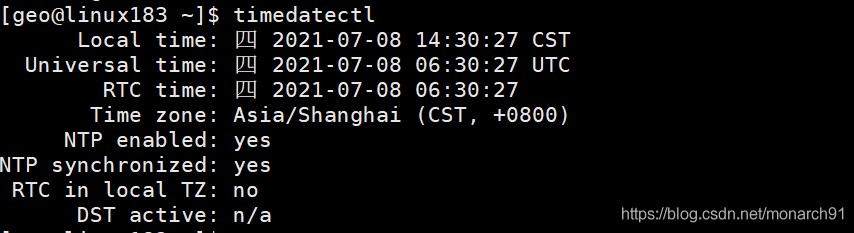
3. 设置时间同步
配置master节点和worker节点的时候都要确认几台机器的时间是否正常。如果正常,可以跳过这步。
如果时间有异常,或者为了更稳妥一点,可以设置一下时间同步。
3-1.
timedatectl
下图是本命令的运行结果,其中 Local time表示当地时间,Universal time表示国际协调时间,RTC time表示硬件时间。
3-2 设置时区为北京时间
timedatectl set-timezone Asia/Shanghai
3-3.设置时间同步网络
这些操作所有命令均在root用户下运行。
3-3-1.安装ntp服务
如果已经安装,此命令会自动无效。
yum install -y ntp
3-3-2.修改ntp相关参数
vi /etc/sysconfig/ntpd
下图是初始参数

将其修改为:

用于修改的文本如下:
SYNC_HWCLOCK=yes
OPTIONS="-g -x"
3-3-3.启动ntp服务
在这里实际调用的是重启命令,这样可以忽略ntp服务的当前状态。
systemctl restart ntpd
3-3-4.设置ntp服务开机启动
systemctl enable ntpd
3-3-5.设置Linux系统时钟与远程NTP服务器同步
timedatectl set-ntp true
4.hostname设置
即可设置全限定域名,删除原有内容,输入完整的全限定域名保存退出即可。比如设置k8s-node这个名称,然后需要重启一次服务器进行生效
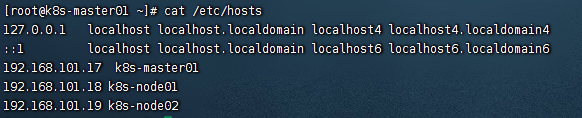
5.hosts (dns解析)设置
vim /etc/hosts 即可设置hosts。K8S集群一般包含多台计算机,hosts的内容应该包含集群内的所有机器。如:
6.关闭防火墙
CentOS7的命令如下:
# 关闭防火墙
systemctl stop firewalld
# 关闭防火墙开机启动
systemctl disable firewalld
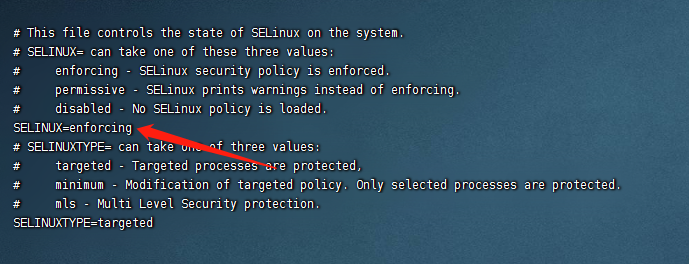
7. 关闭selinux
临时关闭:输入命令setenforce 0。但重启系统后还会开启。
永久关闭:输入命令vi /etc/selinux/config,将SELINUX=enforcing改为SELINUX=disabled,然后保存退出。
8.关闭swap
# 临时
swapoff -a
# 永久
sed -ri 's/.*swap.*/#&/' /etc/fstab
9.安装Docker
Docker的安装方式有多种,我最常用的是通过yum进行安装。命令如下:
yum install -y yum-utils
# 添加yum源,这里添加的是阿里云的yum源
yum-config-manager  --add-repo  http://mirrors.aliyun.com/docker-ce/linux/centos/docker-ce.repo
# 查看docker版本
yum list docker-ce --showduplicates | sort -r
# 您可以选择其他版本
yum  -y install docker-ce-20.10.12-3.el7
# 设置国内镜像加速,你也可以用自己的仓库镜像,这里是我申请的阿里云个人加速镜像
mkdir -p /etc/docker
tee /etc/docker/daemon.json <<-'EOF'
{
  "registry-mirrors": ["https://fuchp8pk.mirror.aliyuncs.com"],
  "exec-opts": ["native.cgroupdriver=systemd"]
}
EOF
# 导入镜像设置
systemctl daemon-reload
# 启动docker
systemctl restart docker
# 设置docker开机启动
systemctl enable docker
脚本管理,从第六步开始都可以用脚本来批量执行每台node机器需要准备的环境,
脚本如下:
#!/bin/bash
firewalld_stop(){
    systemctl stop firewalld >/dev/null
    if [ $? == 0 ];then
        echo -e "\033[32m ####### The service has stopped. ####### \033[0m "
        #关闭防火墙开启启动
        systemctl disable firewalld
    else
        echo -e "\033[31m ####### The service does not exist ####### \033[0m"
    fi
}

selinux_stop(){
    #临时关闭
    setenforce 0
    #永久关闭
    sed -ri 's/SELINUX\=enforcing/SELINUX\=disabled/' /etc/selinux/config
}

swap_shutdown(){
    # 临时
    swapoff -a
    # 永久
    sed -ri 's/.*swap.*/#&/' /etc/fstab

}

docker_install(){
    yum install -y yum-utils
    # 添加yum源,这里添加的是阿里云的yum源
    yum-config-manager  --add-repo  http://mirrors.aliyun.com/docker-ce/linux/centos/docker-ce.repo
    # 查看docker版本
    yum list docker-ce --showduplicates | sort -r
    # 您可以选择其他版本
    yum  -y install docker-ce-20.10.12-3.el7
    # 设置国内镜像加速,你也可以用自己的仓库镜像,这里是我申请的阿里云个人加速镜像
    mkdir -p /etc/docker
    tee /etc/docker/daemon.json <<-'EOF'
   {
    "registry-mirrors": ["https://fuchp8pk.mirror.aliyuncs.com"],
    "exec-opts": ["native.cgroupdriver=systemd"]
   }
EOF
    # 导入镜像设置
    systemctl daemon-reload
    if [ $? == 0 ];then
        echo -e "\033[32m ####### Service load completed. ####### \033[0m "

    fi
    # 启动docker
    systemctl restart docker
    if [ $? == 0 ];then
        echo -e "\033[32m ####### Service startup complete. ####### \033[0m "
    else
        echo -e "\033[32m ####### docker service error, please check. ####### \033[0m "
        exit 1
    fi
    # 设置docker开机启动
    systemctl enable docker
    if [ $? == 0 ];then
        echo -e "\033[32m ####### The docker service is installed. ####### \033[0m "
    fi

}

# 关闭防火墙
firewalld_stop

# 关闭selinux
selinux_stop

# 关闭swap
swap_shutdown

#安装docker
docker_install
评论区